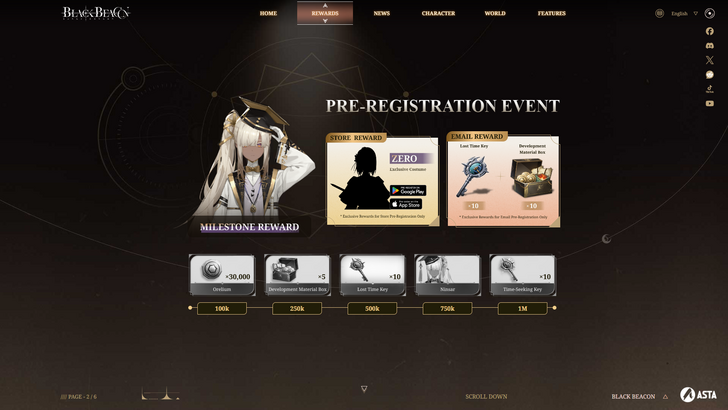
Black Beacon Pre-Register and Pre-Order
Master the art of seamless web translation with Google Chrome! This guide provides a step-by-step walkthrough on efficiently translating web pages, selected text, and customizing your translation settings. Learn these methods to effortlessly navigate multilingual websites.
Step 1: Accessing the Settings Menu
Locate and click the Chrome menu (usually three vertical dots or three horizontal lines) in the upper right corner of your browser.

Step 2: Navigating to Settings
In the dropdown menu, select "Settings." This will open your browser's settings page.

Step 3: Locating Translation Settings
Use the search bar at the top of the settings page. Enter "Translate" or "Languages" to quickly find the relevant settings.
Step 4: Accessing Language Preferences
Click on the "Languages" or "Translation" option that appears in the search results.
Step 5: Managing Languages
In the language settings, you'll find a dropdown menu listing supported languages. Click "Add languages" or review your existing languages. This allows you to add or remove languages as needed.
Step 6: Enabling Automatic Translation
Crucially, ensure the option "Offer to translate pages that aren't in a language you read" is enabled. This will prompt you to translate pages automatically when browsing websites in languages other than your default.
By following these steps, you can unlock Google Chrome's powerful translation capabilities for a truly global browsing experience.
-
 InZOI distinguishes itself from competitors like The Sims by including seasons and dynamic weather systems right in the base game—features that often come as paid additions elsewhere.The life simulation title has already captured players' attention wAuthor : Jacob Mar 29,2026
 -
With less than 24 hours until the Nintendo Switch 2 Direct, where Nintendo will unveil its next-generation console, a new Federal Communications Commission (FCC) filing might provide a glimpse into its plans—at least regarding the Switch 2 controllerAuthor : Aurora Mar 28,2026
-
 This is the Awahime Academy Cultural Festival!Download
 -
 Art Assemble: Home MakeoverDownload
 -
 An ignorant wifeDownload
 -
 Devil’s Academy DxDDownload
 -
 Jackpot Slot GameDownload
 -
![My Swallow Car [Beta]](https://img.laxz.net/uploads/95/1731077402672e251a14cec.webp) My Swallow Car [Beta]Download
My Swallow Car [Beta]Download -
 Virtual Families: Cook OffDownload
 -
 Пол МорфиDownload
 -
 1-19 Number GameDownload
 -
 넷마블 포커 - 바카라, 7포커, 로우바둑이, 뉴포커Download


- Spring Valley Farm Game: January 2025 Redeem Codes
- Mobile Legends: Bang Bang – Best Lukas Build
- "Grand Outlaws Unleashes Chaos and Crime on Android Soft Launch"
- WWE Superstars Join Call of Duty Warzone: Mobile Roster
- Midnight Girl is a minimalist point-and-click adventure set in Paris in the 60s, now open for pre-orders on mobile
- Video Game Song Surpasses 100 Million Streams on Spotify