Delta Force Operations: Winning Strategies and Gameplay Mechanics
Delta Force's Operations mode, also known as Hazard Operations or Extraction mode, is the epicenter of the game's adrenaline-pumping action. Whether you refer to it as Operations or simply "raiding," the core concept remains consistent—parachute into the action, secure valuable gear, and extract safely before other players or AI enemies eliminate you. The unique aspect of this mode, akin to other extraction shooters, is the high stakes; everything you bring in is at risk, and losing means forfeiting it all.
This guide transcends mere survival tactics. It delves into the intricacies of how Operations mode operates from beginning to end, offering insights on pacing your runs, managing your inventory, and making strategic decisions that enhance your long-term value. If you're solely interested in survival strategies for Operations mode, we invite you to visit our blog where we have a detailed guide on the subject.
Whether you're venturing in solo or teaming up with a squad, understanding the mechanics is crucial for playing strategically and efficiently.
What Operations Mode Actually Is
Delta Force's Operations mode is a dynamic PvPvE sandbox where every session unfolds differently. You, along with up to two other players, are dropped into a live map teeming with AI soldiers, loot locations, and rival teams. The objective is clear: amass as much loot as possible and extract successfully before being taken down.
Unlike traditional shooter modes, there's no score to pursue. The loot you manage to extract becomes a part of your external inventory. Conversely, death means losing everything you had on you, save for items secured in your Safe Box. This risk-and-reward dynamic is what fuels the intense atmosphere of Operations mode, even when you're just scavenging for medical supplies and making stealthy exits.
Loadout Planning and Inventory Control
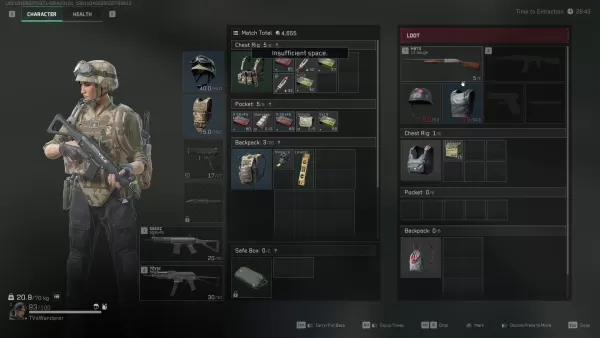
Your triumph begins before you even set foot in the map—it starts with meticulously crafting your loadout. Each match requires an entry fee, so your loadout composition is pivotal. The essentials—helmet, armor, chest rig, and backpack—are mandatory; you can't deploy without them. However, your choices beyond these basics will dictate your approach to the game.

Extraction zones are typically fixed, though some maps feature dynamic elements like elevators or enemy-controlled checkpoints. It's wise to map out your exit strategy before you delve deep into looting.
Loot Smarter, Not Harder
Every item in Operations has a monetary value, but not all are worth the risk. Early on, prioritize acquiring healing items, weapon attachments, and rare electronics—these are compact, valuable, and can be safely stored in your Safe Box if necessary.
While heavy weapons or armor may be enticing, they can encumber you and occupy valuable space. Only pick them up if you're confident in your ability to extract or if you're close to an exit and have nothing to lose.
A valuable tip for newcomers is to steer clear of high-traffic loot areas initially. Allow other teams to clash, then scavenge the remnants. If playing solo, focus on looting around the map's periphery and circle back later. You'll be astonished at the quality of gear left behind post-conflict.
Picking the Right Operative
Your Operative selection shapes your strategy in Operations mode. Not every Operative is suited for stealth or heavy looting, so choose one that aligns with your objectives.
Luna and Hackclaw excel in providing intel and mobility. Luna can mark enemies and disrupt advances with her shock arrows, whereas Hackclaw moves silently and can execute stealthy takedowns with her knife. Stinger, with his healing abilities, is ideal for team play, particularly when supporting more aggressive teammates.
Steer clear of Operatives with conspicuous or attention-grabbing abilities unless your strategy involves direct confrontation. Characters like D-Wolf are enjoyable but draw too much attention in a mode where discretion often yields better outcomes.
Fight When It Matters
In Operations, choosing your battles wisely is more critical than winning them. While PvP engagements can yield gear and XP, they also consume time and attract unwanted attention. Only engage when strategically advantageous or when it's your only viable option.
If you find yourself in a firefight, keep moving and aim to conclude it swiftly. Leverage your Operative's abilities to gain an edge—Luna's detection arrow can reveal enemies behind cover, and Stinger's smokes can provide cover to heal or retreat.
Remember, you can always loot the fallen later. If two teams are battling, hang back and wait for them to weaken each other. While risky, third-partying can be one of the most effective ways to acquire gear without having to outgun everyone.
Making the Most of Each Match
Every raid presents an opportunity to accumulate value, refine your skills, or glean new insights. Don't fret over a poor performance—use it to refine your approach for future attempts.
Conserve your credits during losing streaks and play more strategically when on a winning run. Upgrade your Safe Box at the earliest opportunity, experiment with different Operative setups, and familiarize yourself with the maps to identify the most lucrative loot routes.
With time, your focus will shift from mere survival to optimization. That's when Operations mode truly becomes exhilarating.
Delta Force's Operations mode is far more than a simple loot-and-run scenario. It's a thrilling blend of risk management, strategic planning, and astute decision-making. Construct your loadout with intent, loot judiciously, and know when to engage or retreat. Every loss is merely a step in the journey that makes your first significant victory all the more rewarding.
For the ultimate gaming experience, consider playing Delta Force on a PC using BlueStacks. You'll benefit from quicker load times, precise control, and an easier time managing your gear. It's the optimal way to remain competitive while mastering the game's intricacies.
-
Now is your chance to grab a top-tier OLED TV at one of the lowest prices we've spotted, particularly for a recent 2024 Samsung model. Currently, both Samsung Shop and Amazon are offering the 65" Samsung S85D 4K OLED Smart TV for just $999.99 with frAuthor : Hazel May 08,2026
-
It Has Multiple Endings-----------------------There are nine different endings, all based on the relationships you build with other trapped students. Saving them, ignoring them, or sacrificing them changes where the story goes and what kind of horrAuthor : Hunter May 07,2026


![A Father’s Sins – Going to Hell [Ch. 7 Public] By Pixieblink](https://img.laxz.net/uploads/67/1719578270667eae9eb6a75.jpg)


